Ingredients
Method
Preparation
- Preheat the oven to 350 degrees F and lightly grease and line a 9' x 13' pan with parchment paper, leaving extra hanging over the sides for easy removal. Set aside.
- In a medium bowl, whisk together the flour, baking powder, and salt. Set aside.
- In a larger bowl, use an electric mixer to beat the butter and sugar until light and fluffy, about 3-5 minutes.
- Add in the eggs one at a time, mixing well after each addition. Stir in the vanilla.
- Alternate adding the dry ingredients and buttermilk, starting and ending with the dry ingredients. Mix lightly with a silicone spatula until combined.
Baking
- Pour half of the batter into the prepared pan and bake for 12-15 minutes or until golden brown. Use a spatula to spread the batter evenly in the pan.
- Let the first cake cool in the pan for about 5 minutes before transferring to a wire rack to cool completely. Repeat the process for the second batch of batter.
- Allow both cakes to cool completely before decorating. Wrap them in plastic wrap and chill in the fridge for an hour.
Frosting and Assembly
- For the buttercream, mix the butter and confectioners sugar on low speed while slowly adding heavy cream, one tablespoon at a time, until smooth. Scrape down the bowl as needed.
- Add the vanilla and salt to the buttercream.
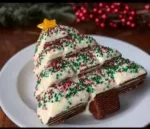
- Once cooled, cut the cakes into Christmas tree shapes. A stencil can help if you want to ensure they are identical.
- Place one cake face down on a serving dish and add a layer of buttercream on top. Line the second cake beside it and flip it on top.
- Apply a thin layer of buttercream all around the cake (crumb coat) to trap any crumbs. Chill in the fridge for one hour.
- Frost the cake again with a thicker layer of icing. Use a spatula for a smooth finish.
- Dye about 1/4 of the buttercream red for decorations. Once frosted, add green sprinkles and pipe on red lines.
- Enjoy!
Notes
Ensure that your butter and eggs are at room temperature for an even batter texture. Use a stencil for cutting the Christmas tree shapes to ensure they are uniform. Don’t skip the chilling step after crumb coating; this will help create a smooth finish.